Saturday, January 29, 2011

Thank You to G&B

So, i'm not sure if you all know about my seam rippers.
I think that's mostly played out on Facebook.
Story is, I seem to go through a HUGE amount of seam rippers.
If you saw my Recycled Wrapper Tutorial, you know why.

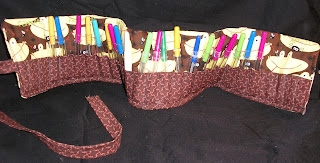
Looky here what Greg & Brooke made and sent to me.
If you go to his blog, you'll see two other versions of these that he made.


how cool is this?  it's made out of frog fabric 


I hope you can see the embroidery he put across the top
"Tonya's Frogging Kit, Rip-it, Rip-it, Rip-it"
(get it, ripping stitches)


here's a close of up of the embroidery......I simply love this.
and love that I have somewhere nice to keep my extensive seam ripper collection.

Thanks G&B

Thursday, January 27, 2011

Happy Birthday to Tj

This is what WE got!
Published with Blogger-droid v1.6.5

Tuesday, January 25, 2011

Up-Cycled/Recycled Wrapper Zippered Coin Purse Tutorial

I've now made a video, see it here

This is a bit lengthy and has alot of pictures.
There's your warning, you still have time to run away.

*If you're coming over from Allfreesewing.com
Welcome*

also

Welcome from Pat Sloan's Facebook page!

Someone asked me awhile back to post a tutorial on recycled wrappers and I can't remember who, and I'm sorry it took so long.  And I still owe someone a Capri Sun tutorial as well. 

This is for a Top Ramen Zippered Coin Purse

you will need:
*recycled wrapper of any kind
*glue stick
*scissors
*ruler
*rotary cutter
*clear vinyl
*zippers
*sewing machine


 using your ruler and rotary cutter, cut about 1/4" off of all four sides, leaving you with two pieces of the wrapper, the front and back
 on the back of all wrappers will be this thicker wide seam, I cut it off, just fold the wrapper over and cut up against the wrapper without cutting the wrapper........make sense?
 now, your two pieces are ready to adhere to vinyl
now about the vinyl......I use 6 gauge clear vinyl from Fabric.com it's $1.95 a yard and I buy 10-20 yards at a time.  It ships to you in a big long roll, almost as tall as I am 5'5
cut a piece of vinyl off your roll big enough to cover your wrappers
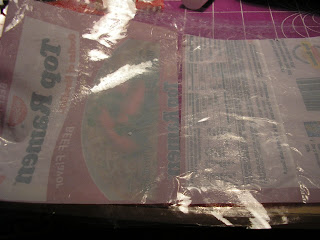
using your glue stick, cover that entire piece of vinyl in glue
 lay your two pieces on top of the glue, pressing it flat and getting out any wrinkles.
 do the same again, making a sandwich out of the wrappers and vinyl, with the vinyl being on the outside
 you'll notice you can see the glue, that's ok, it will dry clear and look beautifully
cut the excess vinyl off and you'll have two perfectly covered wrappers with vinyl
 for the zipper, I found out this past few weeks, some of my friends can't put a zipper in, but i'd bet they could do it like this.......easy peasy........
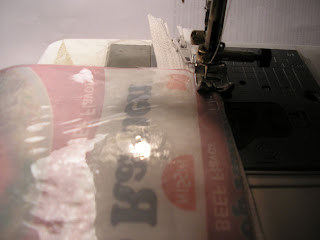
turn your wrapper upside down and line up against the right side of the zipper, sew all the way down
 with that sewn on, flip that wrapper over so you can see the face side and sew it down once again on the front side, like the picture below.
 sewed down the front as well as the back
 do both sides 
 with right sides together, we'll start to sew the coin purse together, so from any side and I use a zig zag stitch at first, kinda like a serger stitch, stitching only down one side of  the coin purse, I even sew through the zippers, (a plastic zipper, not metal) cause I normally use one that's too big and have to trim it to fit.
 once you get that one side zig zagged, open it up like above and open the zipper all the way, this will make turning it rightside out easier with the zipper opened all the way
 here it is zig zagged all the way and I then go around it with a regular stitch, just to ensure stability
 this is optional, but I like a flat bottom better, snip the corners and sew that down to get your flat bottoms
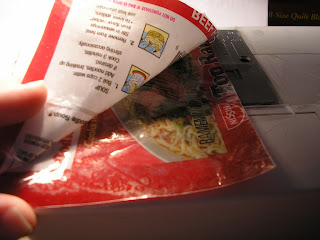
 here's how I break all my seam rippers......I use them to pull out corners that are stubborn
 the inside of my flat bottom coin purse
and now we're done.......I hate how the vinyl shines in pictures.

I know this was long.....I hope it wasn't confusing, if you have any questions, please ask!


**UPDATED 12/13/11*
Every since Allfreesewing.com featured me, I've gotten all sorts of questions and all of them have been from "no-reply" emails.
So, I'll answer them here.

-someone asked if you could use clear contact paper, i'm sure it would work as a vinyl covering, but i'm thinking it will gum up your needle.  guess you'd have to try it and see.

-someone asked if you could use bigger bags.......YES.....and I do, any bag you can cover in vinyl would work.  I wouldn't recommend paper, cause when you turn it inside out, the paper wrinkles and it looks bad.

-the vinyl does goes on both sides of the wrapper (inside and out)

Anonymous asked: My local fabric store stays out of 6 guage vinyl, would 4 or 8 work? Which would be better? Have never sewn vinyl before, but, am excited to try this! 
I think 4 would work better than 8, 4 would be much thinner and the vinyl really don't have to be that thick.

Aunt Spicy asked:  Does it smell like Ramen?
NO, smells like fresh vinyl.  lol

Here's a great tip from Angela Moore: love it!

i used to use a seam ripper for the corners, and yes broke them. then i got some smallish knitting needles in a box of stuff from a friend and i use them instead...no breaky, breaky. hope this helps.

thanks for the pattern :) 
I need to try this tip myself.  Thanks Angela...


Monday, January 24, 2011

Kindle Cases Galore


 hearts zippered Kindle case, I got this one a little snug
dog, pet friendly case 
 pink & white stripped snowflakes
green & flowers


these were the first 3 I made......the first one went to Brooke and the blue one to Pat, and the mushroom one was mine, but someone wanted it, so I sold it.  I  made myself another one today, along with the first four.

I really meant "galore"!

the first four are for sale in my Etsy shop.

Saturday, January 22, 2011

Hexagon Pillow

I had two Hexagon's left over from my quilt. So, I made a pillow. I think it turned out ok.

Posted by Picasa

Go over and check out a new blog Tainted Fibers

Hexies and another finish.

remember these hexies?


look at them now....


because i lost this pattern, i assumed i should assemble the hexies into whole hexies
WRONG
i should have left them in half's
i didn't want to rip out all that stitching, i had already ripped out a lot
so, i started sewing them together one at a time in a "Y" seam
now i can say i can successfully sew a "Y" seam
can you?


remember this project?
my simple straight lines....


i turned it into this,
a table runner or door hanger
and yep, there's that polka dotted fabric again


 a quote that goes perfect with my hexies quilt top

"as you sew, so shall you rip"

Friday, January 21, 2011

Winners

 the winner of the Mix & Match Quilts with the Accuquilt GO is


Random number between 1 and 275


Cindy said...

I believe Accuquilt needs to label the dies with the NAMES of the die. This would help tremendously.

I've also wondered, and please forgive me if this sounds harsh, how a book can be critiqued if one doesn't sew an actual item from the book like so many reviews.

I appreciate your honestly, Tonya. And I trust your judgement because you DID make a block, even without all the dies.

Cindy please comment on this post and I'll reply back to get your snail mail.

and now the winner of the CSN $50.00 gift certificate is:

Random number between 1 and 8532


Gene Black said...

I blogged it at http://artbygene.blogspot.com/2011/01/giveaway-alert.html

Pick me, please!

Gene, please comment on this post and I'll let you know how to get your GC.

I'm sorry I didn't post yesterday, our internet, tv and phone were off and on all day.


Thursday, January 20, 2011

internet down

I will post the winners as soon as our internet comes back up.
Published with Blogger-droid v1.6.5

Wednesday, January 19, 2011

Last chance to enter for the $50.00

go here to find out how....

I will post the winner tomorrow evening for the $50.00 and the GO book


Mix & Match Quilts with the Accuquilt GO! Blog Tour

Welcome to the next stop on the blog tour.

Remember the Accuquilt GO?

This book has 12 "Fresh Designs using Traditional Shapes" to make quilts with your GO and dies.


This is the quilt I was asked to review,
Flash of Lightning on pg. 26


I did make a block from this pattern, I didn't have all the dies, so I had to wing it.
I thought it was a bit difficult.  I would like to see the dies names and not the item #'s.
I also don't cut my fabric into strips and then cut on the die, I just cut with the die.
After making the first block, I didn't go any further.  I do think it's a great book if you have all the dies or use your GO daily.

 I am offering up my copy of the book.  (I did write on my page in pencil, I'll erase it, but you might still see it.) Just leave a comment on this post and I'll draw a winner on Thursday (tomorrow).

If you don't win, you can purchase the book here.

To follow this tour, the next stop is Jacqueline Kunkel, that's today as well.

tomorrow's stop is with Nettie Peterson

Friday's stop is with my friend Mary Flynn


My GOOD friend Pat was supposed to be a stop on this blog tour as well, I would have love to know her take on this book, though I know she'll still tell me.  She's on vacation and was unable to make a post.

remember to leave a comment if you would like to win my copy of the book


(back to my hexies and the other project tomorrow)

Tuesday, January 18, 2011

Nothing like the......

simplicity of sewing straight lines......


i'll update you on the hexies tomorrow.......


Monday, January 17, 2011

Question ? ?

(the $50.00 giveaway is here)


i've lost the pattern to this, so i'm winging it
it's an old UFO

i've got the hexies all pieced together and now i'm attempting to join them into rows, do i really sew it together in rows just like it's laying?  cause that is tricky

i've got the first two joined, that first red one and the half blue one.....perfect, it all lines up, but the further i go down the row, the more and more they are off and not lining up, i guess i could pin, pin, pin

i just want to make sure this is how i go about sewing the rows....i'm think the pattern had a trick to doing this, but i can't remember.  the pattern was a small piece of paper folded up, therefore making it easier for ME to loose it

any help would be sooo appreciated


update:  i may have found the trick piecing them together one at a time, and not in row form

Saturday, January 15, 2011

Fabric Magnets Tutorial

(the $50.00 giveaway is here)

someone asked for a tutorial for yesterday's post on fabric magnets
your wish is my command

you will need:
scissors
scrap fabric (great way to use scraps, even down to 2" in size)
a bag of small accent glass gems (got mine at the dollar tree, these are usually used in vases for decoration, get them as flat as you can, mine are 1 1/4 in diameter)
mod podge
paint brush
hot glue gun or some type of glue
neodymium magnets (these are the perfect size and super, super strong)

 get your supplies ready
 paint a coat of mod podge to the back (flat side) of the gem
 place the gem, mod podge side down where you want it on your scrap fabric
i placed it right on top of a lemon
once i find the placement and stick it down, i twist it just a little, that assures a good placement that will stay
 cut the fabric out around the gem, you can cut right up against it and have a smooth finish
 do another coat of mod podge on top of the fabric
 give it time to dry, you can tell when it's dry, cause it turns clear
 get your magnet ready for gluing, i use hot glue, some use gorilla glue
 it just takes a little bit
 place magnet right on top of glue
waaaaaa-laaaaa finished fabric magnet