I've now made a video, see it here
This is a bit lengthy and has alot of pictures.
There's your warning, you still have time to run away.
*If you're coming over from Allfreesewing.com
Welcome*
also
Welcome from Pat Sloan's Facebook page!
Someone asked me awhile back to post a tutorial on recycled wrappers and I can't remember who, and I'm sorry it took so long. And I still owe someone a Capri Sun tutorial as well.
This is for a Top Ramen Zippered Coin Purse
you will need:
*recycled wrapper of any kind
*glue stick
*scissors
*ruler
*rotary cutter
*clear vinyl
*zippers
*sewing machine
using your ruler and rotary cutter, cut about 1/4" off of all four sides, leaving you with two pieces of the wrapper, the front and back
on the back of all wrappers will be this thicker wide seam, I cut it off, just fold the wrapper over and cut up against the wrapper without cutting the wrapper........make sense?
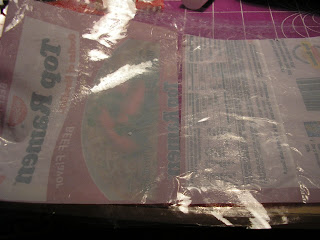
now, your two pieces are ready to adhere to vinyl
now about the vinyl......I use 6 gauge clear vinyl from Fabric.com it's $1.95 a yard and I buy 10-20 yards at a time. It ships to you in a big long roll, almost as tall as I am 5'5
cut a piece of vinyl off your roll big enough to cover your wrappers
using your glue stick, cover that entire piece of vinyl in glue
lay your two pieces on top of the glue, pressing it flat and getting out any wrinkles.
do the same again, making a sandwich out of the wrappers and vinyl, with the vinyl being on the outside
you'll notice you can see the glue, that's ok, it will dry clear and look beautifully
cut the excess vinyl off and you'll have two perfectly covered wrappers with vinyl
for the zipper, I found out this past few weeks, some of my friends can't put a zipper in, but i'd bet they could do it like this.......easy peasy........
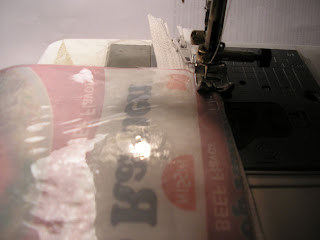
turn your wrapper upside down and line up against the right side of the zipper, sew all the way down
with that sewn on, flip that wrapper over so you can see the face side and sew it down once again on the front side, like the picture below.
sewed down the front as well as the back
do both sides
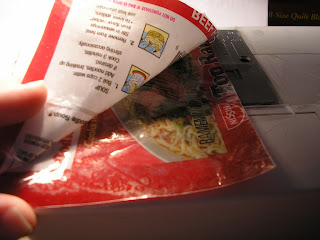
with right sides together, we'll start to sew the coin purse together, so from any side and I use a zig zag stitch at first, kinda like a serger stitch, stitching only down one side of the coin purse, I even sew through the zippers, (a plastic zipper, not metal) cause I normally use one that's too big and have to trim it to fit.
once you get that one side zig zagged, open it up like above and open the zipper all the way, this will make turning it rightside out easier with the zipper opened all the way
here it is zig zagged all the way and I then go around it with a regular stitch, just to ensure stability
this is optional, but I like a flat bottom better, snip the corners and sew that down to get your flat bottoms
here's how I break all my seam rippers......I use them to pull out corners that are stubborn
the inside of my flat bottom coin purse
and now we're done.......I hate how the vinyl shines in pictures.
I know this was long.....I hope it wasn't confusing, if you have any questions, please ask!
**UPDATED 12/13/11*
**UPDATED 12/13/11*
Every since Allfreesewing.com featured me, I've gotten all sorts of questions and all of them have been from "no-reply" emails.
So, I'll answer them here.
-someone asked if you could use clear contact paper, i'm sure it would work as a vinyl covering, but i'm thinking it will gum up your needle. guess you'd have to try it and see.
-someone asked if you could use bigger bags.......YES.....and I do, any bag you can cover in vinyl would work. I wouldn't recommend paper, cause when you turn it inside out, the paper wrinkles and it looks bad.
-the vinyl does goes on both sides of the wrapper (inside and out)
Anonymous asked: My local fabric store stays out of 6 guage vinyl, would 4 or 8 work? Which would be better? Have never sewn vinyl before, but, am excited to try this!
I think 4 would work better than 8, 4 would be much thinner and the vinyl really don't have to be that thick.
Aunt Spicy asked: Does it smell like Ramen?
NO, smells like fresh vinyl. lol
Here's a great tip from Angela Moore: love it!
i used to use a seam ripper for the corners, and yes broke them. then i got some smallish knitting needles in a box of stuff from a friend and i use them instead...no breaky, breaky. hope this helps.
thanks for the pattern :)


What a cute idea! Great tutorial Tonya!
ReplyDeleteI agree!
DeleteGreat little coin purse, and the tutorial is just fine!
ReplyDeleteGood job on the tutorial. I would say that sewing over a metal zipper is a recipe for disaster. Fortunately I only broke a needle, but ..well let me just say, I won't sew over a metal zipper again!
ReplyDeleteAnd that is why I haven't tried another zipper! ha ha.
Great job on the tutorial. Believe or not I taught myself how to sew, and replacing a zipper in my favorite pair of jeans when I was 12 was the first project I did. It took me 4 days on and off, as I wasn't allowed to touch my mothers sewing machine, period!!! So I had to sneak a little here and there when she wasn't home. I got the zipper replaced, and wore those jeans till then shredded!
ReplyDeleteAwesome tut!! You rock!!
ReplyDeleteGreat tutorial, what a fun little project. Thanks for sharing.
ReplyDeleteGreat tutorial! I keep forgetting to save candy bags to make one of these. Geesh!
ReplyDeletewhat a fun project
ReplyDeleteYou are the woman!
ReplyDeleteJust found your website and love your recycled wrappers. They're so cute. I know I've just got to make a beach bag for the summer.
ReplyDeleteOkay...but does it smell like top ramen?
ReplyDeleteThe tutorial looks great!
Does not smell like top ramen at all. That would make it interesting huh?
DeleteSmells like fresh vinyl. lol
Deleteyou are so super duper talented tonya!! great tutorial.
ReplyDeleteThanks, what a talented person you are.
ReplyDeleteGreat tutorial, Tonya.
ReplyDeleteIs it regular old Elmer's gluestick?
ReplyDeleteYes, just a regular glue stick. I've also found the Lapel sticks work just as good and glide onto the vinyl a lot smoother.
DeleteI love this tutorial. I am going to have to try to make one of these coin purses. I do have a couple of questions. Is the gluestick a certian kind or just elmers gluestick? Does the glue ever come off the vinyl. I guess is wounldn't matter after it is sewn. You did a great job on the tutorial.
ReplyDeletethim3@hotmail.com
Any kind of glue stick and it all dries clear under the vinyl.
DeleteYou have a great imagination, something I am lacking.
ReplyDeletegreat; what other , larger bags could you use;
ReplyDeletegreat job kid; real nice directions.
can you do some more examples?
thank you
Pgh. Phyl
just wanted to say to Ann Marie, YOU ROCK, GIRL! So nice to read about that zipper replacement you did - inspiring me that I can indeed do these kinds of projects. And to you, thank you for this tutorial - I don't know when I'll get a chance to try it, but I do want to! I wonder, can this be done with a bag like my Fritos bag?? I guess I'd have to cut it down a little shorter, huh.
ReplyDeleteAwesome tutorial! I was thinking that instead of gluing vinyl down, a person could use the adhesive-backed, clear contact paper. I've used that for covering softcover books for years and it holds up very well. Just an idea! Thanks!
ReplyDeleteLOL! why didn't you just use the clear vinyl, geesh... not truly recycled, but cute.
ReplyDeleteLOL..I did use clear vinyl...go back and re-read the tutorial. It is recycled if I re-used the Top Ramen wrapper. geesshhh.....lol ;)
DeleteOh, I know what all my friends and family are getting for Birthdays and Christmas next year! They already get crafted items, and this is going to blow them away!
ReplyDeleteThank you for your creativity!!
great job on the tutorial! Fun project.
ReplyDeleteAnother source of vinyl is the packages that sheets come in... I use those to keep project pieces together, but once/if it is torn, I use the vinyl for luggage tags, and other project like this one.
ReplyDeleteThis is soooooo cute! I'm going to make one for my 17 years old daughter.
ReplyDeleteDo you put vinyl on both sides of the wrapper? Meaning, is the vinyl also on the inside of the purse??
ReplyDeleteI sometimes make flat bottomed bags from washed plastic dogfood bags. Open the bottom of the bag. Cut down the side seam. Fold down top and sew. Remove two 3" strips from the bottom, fold and sew to make two handles and attach securely to sides. With right sides together sew side seam and bottom. While the bag is still inside out turn the bag so that one side is up and just sew across the point. (2" across = 2" bottom, repeat with the other side. No need to cut off the points after sewing you still get a flat bottomed bag. Turn right side out. For larger bags I cut cardboard the size of the bag bottom and sandwich it in bag material and sew. Then place the covered cardboard in the bottom for extra strengh. My husband prefers the brand name on the inside of his totes - but some might prefer the dogfood logos to show. Have used them to carry produce, tools, books, etc.
ReplyDeleteThanks for an AWESOME IDEA! Great tip too LW!!!
ReplyDeleteFor Ann H
ReplyDeleteLooks to me she means to snadwich your soup bag in between both vinyl sheets...
Jen from MD
I LOVE YOU! I have a huge roll of clear vinyl sitting in the corner AND I have been trying to figure out how this is done for ages. <3 <3 <3
ReplyDeleteThe pictures make this SO simple! Mmmmmmmuah!
((((((((((((((hug))))))))))))))))
I made log carriers out of large bird seed, chicken feed or deer feed bags. I trim the top, bottom and sides until I have to large retangular pieces that are the same size. Sew the bottoms, right sides together. Then just turn under the sides 1/2" and topstitch (do not sew them together because you want it to be like a big beach towel). Then I cut a triangle off each top/side and place a 1 1/2" X 12" handle made out of denim from old jeans or webbing. I really reinforce the handle so it will be secure when hauling heavy logs. Works great...and free!!!
ReplyDeleteI just love it!Thank for sharing with us,keep creating!Happy 2012!
ReplyDeleteGreat idea..throughout the year my granddaughter and I did some cute projects, and this one will be a neat one for her to do this coming year....Happy New Year..
ReplyDeleteGreat tutorial :) I love to try new things, but sometimes the instructions are not detailed enough. These were perfect. Love,love all the pictures.I have wondered how this was done for an long time. As a newbie crafter, I think I might be able to pull this off:) You ROCK!!
ReplyDeletelove it!
ReplyDeletei used to use a seam ripper for the corners, and yes broke them. then i got some smallish knitting needles in a box of stuff from a friend and i use them instead...no breaky, breaky. hope this helps.
thanks for the pattern :)
oh, oh -I have an M &M bag -wouldn't THAT be fun! great tut . . .
ReplyDeleteMy local fabric store stays out of 6 guage vinyl, would 4 or 8 work? Which would be better? Have never sewn vinyl before, but, am excited to try this!
ReplyDeleteOH my goodness!!! This is the absolute coolest thing ever!! I am brand new to sewing and cannot wait to try this out thanks so much for this tutorial!! I love it. I do have a question.. does just any type of thread work for this? And.. You mentioned that you were going to do a Capri Sun tutorial .. I would LOVE to see that I've always wanted to learn how to make those awesome things with the capri suns... If you should ever happen to make one I would love to know. Im now following your blog so hopefully you do make that tut and i'll get to see it :D Thanks so much for sharing this I just can't get over how awesome it is!!
ReplyDelete-jamie
babyblueangel_30@yahoo.com
This comment has been removed by a blog administrator.
Deletecool!! i have been wanting to try something w/ the large bags that cat food comes in, i have a few saved, just didn't know what to do....this would work! just gotta be sure to wash out the kibble scent or my cats will be going crazy....
ReplyDeleteLoved the idea! Can't wait to make some.
ReplyDeleteWhat a unique, fun idea. I ALWAYS have Ramen in my cupboard, my husband still love it, even AFTER college.
ReplyDeleteuse chopsticks to push the corners out. they don't poke through and won't break!
ReplyDeletewhat size zipper I a figuring the smallest sized one
ReplyDeletethanks for any info cannot wait to get started on this project
I just judge it based on the size of my wrapper. If it's a nylon zipper, which I always use, you can cut those to fit, and just stitch up the ends. Thanks....I love to see yours when you get it completed.
DeleteYou ROCK!! This is fun and unique. M&M or Reese's peanut butter cup wrappers are sounding like a fun design too~ I'm not saying I have any of those wrappers though... ;p Thanks for the idea!!
ReplyDeleteVery Creative. Definitely I will try. Thanks
ReplyDeleteI think I will buy a bag of starburst candy (my sisters favorite), empty it, use it to make a zippered bag with this tutorial, and then put the candy back in it and give it to her for her birthday! Two gifts in one! Thanks for the great ideas!
ReplyDeleteThat's a great idea!
DeleteAnother thing to use for poking out the corners is a wooden chop stick!
ReplyDeleteYes, you can use chop sticks.
DeleteI have a huge cooking chopstick that I rounded the end on - it is my favorite corner poker and I use it a lot when turning tubes!
DeleteThis is a great idea for Christmas when you just need that little something extra!! I found vinyl at Walmart for $.97/yard. Now to the grocery store for the noodles. I may try making a tote to go with it.
ReplyDeleteTHANK YOU!!
I love making these.My family will be surprised at Christmas.Thank you.How do I get the juice smell out of Capri pouches?
ReplyDeleteCool blog! Is уour theme custom mаde oг ԁid уоu dоωnlοad іt frοm somewhere?
ReplyDeleteA theme like yours ωith a few simplе aԁjustements woulԁ really makе my blog jump out.
Рlеаse lеt me κnow wherе
you got your thеme. With thanks ec2-50-16-250-92.compute-1.amazonaws.com
As a quilter, I am going to use many different wrappers and make a tote to use for shopping!!
ReplyDeleteIt is a great idea. Going to try it. Tired of trying to make purses out of jeans. Just learning so hope it goes well.
ReplyDeleteDonna Messner
This is the cutest thing I've ever seen.
ReplyDeleteOMG........I was known for the "Mr. Noodles" I lived on while going to school.....this project is PRICELESS! I would never had understood your directions without the pictures.....Thank you! I refuse to eat packages of noodles anymore, but can surely get wrappers to make these darling coin purses. Thank you for the inspiration!
ReplyDeleteHello Tonya, what a fab' idea!! Thank you for posting the tutorial. At times I am not sure to get it, often because I can't see what you mean on the picture... Can I just ask that one - you say (or so, I can't go back up now lol)
ReplyDelete'I use end of zippers like this for stubborn corners'.... How? What do you mean? Lol! I can't see or understand anything! Haha sorry for being so stupid!!! Thank you if out find the time to answer. I have recently thrown away all of them zipper ends I was keeping 'in case/ to find a way to use them'... and finally moving yet again I have ten up to Mr Bin. But I'll get more! All the best Mrs Crafty xx